This article shows you how to create a shooting canon tower. We'll use the powerfull open source Irrlicht Engine for this task. You are not limited to a canon tower. This also applies e.g. for a player with a weapon. The bullet should fire in the direction the weapon is aiming. Additionally we want to rotate the tower if we press some buttons.
The key points of this article are:
- Loading a 3d model in irrlicht
- Make the canon tower rotate around its y-axis by specific keys
- Let the canon tower fire through a key event
- You will learn dealing with the coordinate system in Irrlicht
Starting Point: Empty Project
We'll start with an empty world. A good place to start learning to use Irrlicht is the tutorial section. There we'll get our empty template project for the start. Create a file named "Main.cpp" and put the following content into the file:
#include <irrlicht.h>

using namespace irr;
using namespace core;
using namespace scene;
using namespace video;
using namespace io;
using namespace gui;

int main() {
	IrrlichtDevice *device =
		createDevice(video::EDT_OPENGL, dimension2d(640, 480), 16, false, false, false, 0);

	if (!device)
		return 1;

	IVideoDriver* driver = device->getVideoDriver();
	ISceneManager* smgr = device->getSceneManager();

    smgr->addLightSceneNode(0, vector3df(0, 20, -5));

	ICameraSceneNode* camera = smgr->addCameraSceneNodeFPS();
	camera->setPosition(vector3df(0, 10, -40));
	camera->setTarget(vector3df(0));

	while (device->run()) {
		driver->beginScene(true, true, SColor(128, 128, 128, 100));

		smgr->drawAll();

		driver->endScene();
	}
	return 0;
}
We're initializing all important variables for later to get access to the scene manager for adding nodes and so on. Next we're creating a light source and a FPS camera. If we run the project we should see nothing except the background color.
The Canon Tower
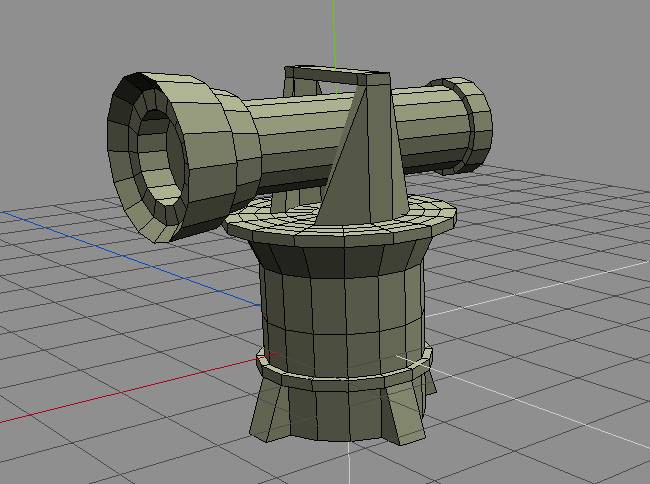
You can download the basic 3d model created by me here or create one yourself. I've used my favourite modeling tool Wings3D for this task.
Insert the Canon Tower in your World
To keep the code clean and simple in the course of this article I'll omit the whole error checking parts.
In the next step we will create a scene node which represents our model:
ISceneNode* canonTower = smgr->addMeshSceneNode(smgr->getMesh("./canonTower.3ds"));
canonTower->setPosition(vector3df(0));
You have to place you 3D model next to you source file in this example.
Intercepting Key Events
If we want to rotate the tower with our keyboard we have to intercept those events. We'll use the MyEventReceiver class mentioned in the movement tutorial. Create a new file name "MyEventReceiver.h" and put this content into the file:
#pragma once
#include <irrlicht.h>
#include "IEventReceiver.h"

using namespace irr;

class MyEventReceiver :
	public IEventReceiver
{
private:
	// We use this array to store the current state of each key
	bool KeyIsDown[KEY_KEY_CODES_COUNT];
public:
	// This is the one method that we have to implement
	virtual bool OnEvent(const SEvent& event)
	{
		// Remember whether each key is down or up
		if (event.EventType == irr::EET_KEY_INPUT_EVENT)
			KeyIsDown[event.KeyInput.Key] = event.KeyInput.PressedDown;

		return false;
	}

	// This is used to check whether a key is being held down
	virtual bool IsKeyDown(EKEY_CODE keyCode) const
	{
		return KeyIsDown[keyCode];
	}

	MyEventReceiver()
	{
		for (u32 i = 0; i<KEY_KEY_CODES_COUNT; ++i)
			KeyIsDown[i] = false;
	}

};
This class gives us the needed functionality to listen for key events and handling them. At the very beginning of our code in "Main.cpp" we instantiate our event receiver class like this:
MyEventReceiver receiver;Don't forget to include this class at the very beginning of your source code with "MyEventReceiver.h"! Now we have to set our event receiver so that Irrlicht is aware of it. There a two ways:
- As we create our irrlicht device
- Using the appropriate setter method
//at device creation
IrrlichtDevice* device = createDevice(video::E_DRIVER_TYPE::EDT_OPENGL, core::dimension2d(640, 480), 16, false, false, false, &receiver);
//or later...
device->setEventReceiver(&receiver);
Next we check for specific key events in our main game loop and start rotating the canon tower. So place this piece of code at the beginning of your game loop in "Main.cpp":
	u32 then = device->getTimer()->getTime();
	float rotationSpeed = 20;
	while (device->run()) {

		// Work out a frame delta time.
		const u32 now = device->getTimer()->getTime();
		const f32 frameDeltaTime = (f32)(now - then) / 1000.f; // convert time in seconds
		then = now;

		if (receiver.IsKeyDown(irr::KEY_KEY_A)) {
			vector3df roty = canonTower->getRotation();
			roty.Y += rotationSpeed * frameDeltaTime;
			canonTower->setRotation(roty);
		} else if (receiver.IsKeyDown(irr::KEY_KEY_D)) {
			vector3df roty = canonTower->getRotation();
			roty.Y -= rotationSpeed * frameDeltaTime;
			canonTower->setRotation(roty);
		}
//......
I use the A, and D key for the rotation of the tower around the y-axis. The attentive readers might have seen that I also implemented a time factor for the rotation that is multiplied with the rotation speed. This technique is known as frame independent movement and can be studied here or here in more detail. The movement is made frame independent by multiplying it with the variable frameDeltaTime. So every second the tower will rotate 20 units.
I have to mention that Irrlicht uses a left-handed coordinate system. That means positive angle values will rotate objects clockwise and negative angle values will rotate objects anticlockwise. Look at the figure below. On the left-hand side of the following figure a left-handed coordinate system is displayed:

"Cartesian coordinate system handedness". Licensed under CC BY-SA 3.0 via Commons.
Other than in the figure above in Irrlicht the axis that goes up is the y-axis (perpendicular to the plane that the x, and z axis are spanning). So we have to manipulate the y-axis to rotate the canon tower.
Canon Tower in Action
Creating and Positioning the Canon Ball
To make the canon tower a fireing tower we have to add a canon ball or something. For that we'll use the built in feature in Irrlicht to create a sphere which will functioning as the canon ball. For that we'll write a function and put it above the main() function:
ISceneNode* createCanonBall(ISceneNode* canonTower, scene::ISceneManager* smgr) {
	IMeshSceneNode* bullet = smgr->addSphereSceneNode();
	bullet->setMaterialFlag(video::EMF_LIGHTING, false);

	f32 scale = canonTower->getScale().Y / 12.5;

	bullet->setScale(vector3df(scale));

	vector3df moveBy = vector3df(0, 2.5, 0);
	matrix4 matrix = canonTower->getAbsoluteTransformation();
	matrix.transformVect(moveBy);

	bullet->setPosition(moveBy);
	return bullet;
}
To calculate the exact starting position of the projectile you can use the bounding box of the canon tower. But in this example it's sufficient to find it out by experimenting a bit. The goal is to position the canon ball relative to the canon tower. There are two possible ways to position the projectile:
- Adding it as child to the canon tower and then do the positioning
- By local translation using the transformation matrix of the canon tower
Adding the projectile as child node of the canon tower we can manipulate the projectile as if we are using absolute coordinates because the root/parent and so the point of origin would be the tower and its position.
However, we'll use the second approach. We have to get the absolute coordinates of the canon tower (the world coordinates) and move the canon ball relative from that position.
If we want to position the projectile relative to the canon tower we have to transform the local coordinates of the position into global coordinates for the projectile later. We aquire the global (absolute) transformation matrix and adding our relative (local) vector to it. We position the projectile some units in the positive direction of the y-axis:
vector3df moveBy = vector3df(0, 2.5, 0);
matrix4 matrix = canonTower->getAbsoluteTransformation();
matrix.transformVect(moveBy);
You have to experiment a bit to find the correct value for the local coordinates. Because we only need to go "up" along the y-axis we don't need to set values for the x, and z axis in our moveBy vector. Using the transformVect() function saves us a lot of work if we would calculate the absolute position by hand. Our new global coordinates are now stored in moveBy. We can set the projectile's position by:
shot->setPosition(moveBy);So we can be sure that every time despite the current tower's transformation like scaling or translating (which affecting the position of the tower) the projectile will always be inside in the middle of the tower at the same level as the canon barrel.
Preparation for the Action
The next part will be making the canon ball move in the direction the tower is looking. First we need to define the front of our canon tower. Technically speaking there is no real "face" or "front side" of an object. This is important when you generally model your own objects. 3D modelling tools let you sometimes specify the Forward and Up direction of the model when exporting. In Wings3D we have to rotate our model to the desired position.
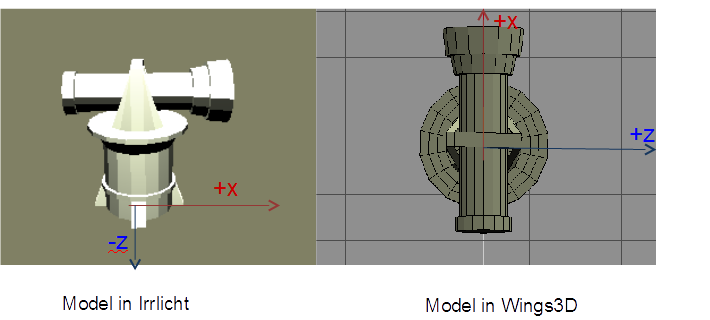 Comparison of the object in Wings3D and the model loaded into Irrlicht
In this tutorial the front is the side which is facing towards the positive x-axis with a rotation angle of 0° of the y-axis. We need this definition later for the actual movement and polar coordinates calculation. It's all a matter of the coordinate system and you have to take this into account when programming. Otherwise the animation would not look right (not shooting out of the barrel in this case) or have to do cumbersome math. The figure below shows the coordinate system of Irrlicht.
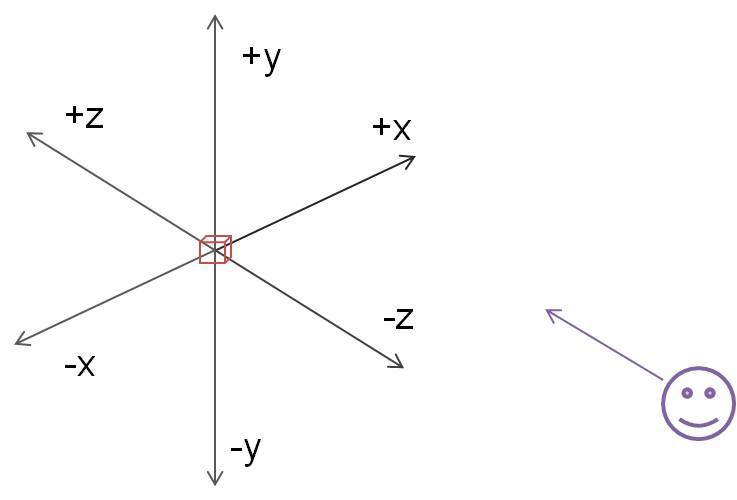
When a node in Irrlicht is moved towards the screen or camera (in the initial position and rotation) then we have to go in the negative direction, translating it by a negative amount. If we want to translate it to the right we have to add the appropriate amount for the movement to the x-axis. We use this information of the Irrlicht coordinate system for our movement. Remember that Irrlicht has a left-handed one. If we rotate the object by a positive angle value the object would rotate to the left. To make the movement of the projectile in relation to the y rotation angle of the canon tower it's convienent that we use polar coordinates to calculate the position.
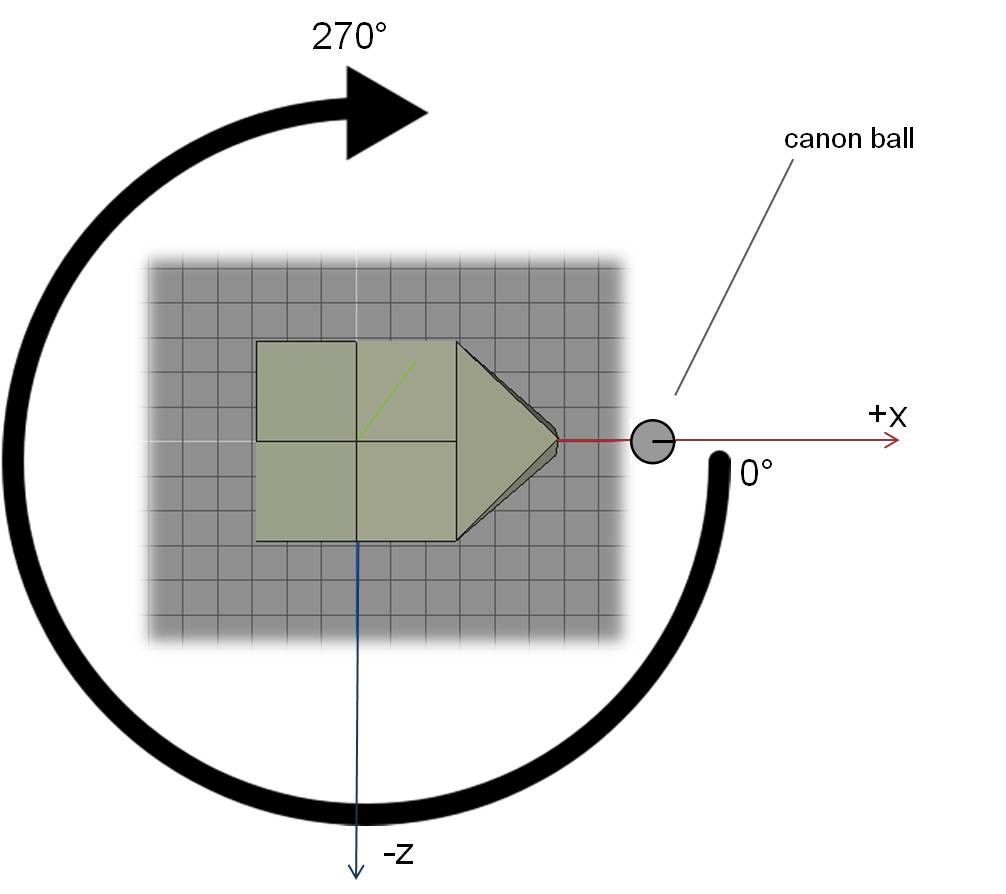
The right figures shows the top view of the canon tower and the relation of the canon ball to the tower. The position of the projectile depends on the tower's rotation angle.
Polar coordinates

„Ebene polarkoordinaten“ von Honina aus der deutschsprachigen Wikipedia. Lizenziert unter CC BY-SA 3.0 über Wikimedia Commons.
We need the angle of the canon tower and the radius which in this case is the magnitude or velocity of the movment. From these polar coordinates we have to transform them back into cartesian coordinates by the following equations as depicted also in the figure above:
The minus in this case is due to the anticlockwise rotation of the left-handed coordinate system.
In code that means:
vector3df Pos = bullet->getPosition();
vector3df Rot = canonTower->getRotation();
Pos.X += 60 * frameDeltaTime * cos(Rot.Y*PI / 180);
Pos.Z -= 60 * frameDeltaTime * sin(Rot.Y*PI / 180);
bullet->setPosition(Pos);
The sin() and cos() functions take radians and Irrlicht gives as the angle in degrees. Therefore a conversion is necessary. Every second the canon ball will be moved by 60 units. One unit in Irrlicht is one meter. Additionally we multiply it with a time factor for frame independent movement as before. By that we can be sure that every second the canon ball will be translated the exact same amount.
Fire event
In our game loop we place the code for the creation of the projectile. It should be fired when the key F is pressed:
//outside the game loop
ISceneNode* bullet = nullptr;

// ...

//inside the game loop
if (receiver.IsKeyDown(irr::KEY_KEY_F)) {
    bullet = createCanonBall(canonTower, smgr);
}
For the movement we check in our gameloop if the bullet was created. Only then we execute the movement part described above:
if (bullet != nullptr) {
	vector3df Pos = bullet->getPosition();
	vector3df Rot = canonTower->getRotation();
	Pos.X += 60 * frameDeltaTime * cos(Rot.Y*PI / 180);
	Pos.Z -= 60 * frameDeltaTime * sin(Rot.Y*PI / 180);
	bullet->setPosition(Pos);
}
The bullet is moving as long as the F key is pressed again. Then a new bullet is being shot.
Final code
You can download the whole code here.
Always rember to make yourself first familiar with the coordinate system in Irrlicht or any other engine you are using. Then define the "front" of a node which is later used for the movement. Those things affect the underlying math. This could have been any other direction but than the conversion from polar coordinates to cartesian coordinates would have been different. For example:
if the front of the object was looking towards the negative z-axis.
Exercise
What changes are needed if we want to shoot the canon ball only a certain distance in a certain time?