TinyMCE is a powerful web-based WYSIWYG editor that brings a lot of functions and plugins with itself. It´s also very easy to build your own plugin and add a custom dialog and custom button to the toolbar of the editor.
Before we getting started let's see how easy it is to build a dialog. Elements of the dialog can be defined by passing an array of objects to the body argument of the editor.windowManager.open() function:
editor.windowManager.open({
                title: 'Example plugin',
                body: [
                    {type: 'textbox', name: 'title', label: 'Title'}
                ],
                onsubmit: function(e) {
                    // Insert content when the window form is submitted
                    editor.insertContent('Title: ' + e.data.title);
                }
            });
This utility class helps us to open a new dialog and the layout and design will follow the style rules of the editor. Dynamically generated elements are possible as well:
function createItems() {
    var items = [];
    for(var i = 0; i < 3; i++) {
       items[i] = {type: 'textbox', name: 'text'+i, label: 'Text'+i};
    }
    return items;
}
[...]
editor.windowManager.open({
    title: 'Example plugin',
    body: createItems()
});
You may also specify the content of the dialog in another *.html file and include it like in the following example:
// Opens a HTML page inside a TinyMCE dialog
editor.windowManager.open({
    title: "My html dialog",
    url: 'mydialog.html',
    width: 700,
    height: 600
});
Moreover you have the possibility to create tabs, textareas, etc. But I found that approach difficult for creating complex dialogs. The documentation of TineMCE provides us only with little information on that. You can build dropdown lists, tab panels etc. but you have to dig deep into the included plugins. This wasn't a solution for me.
Furthermore I wanted to reuse my existing bootstrap modal. This article describes a way to make a plugin in TinyMCE 4.2.1 which uses a bootstrap modal for the appearance of the dialog combined with D3 for the creation of the elements.
As an example we'll build a small image browser that will give us a preview of our available images as thumbnails which are stored on the server. The server provides us with a JSON object containing all the necessary information to display an image:
[
 {id: 1, imageNormal: "...", imageThumb: "...", description: "..."},
  etc.
]
The plugin communicates with the server through ajax in order to subsequently process this JSON object for displaying an image list. If we click on an image in our image browser that picture should be inserted in the editor where the cursor was placed before. Without further ado let´s start!
Setting up TinyMCE
Put this in the head section of your HTML document to introduce TinyMCE for the rest of the page and change the path according to your installation:
<script src="js/tinymce/tinymce.min.js"></script>Then define a common textarea in your document that will function as the actual editor:
<textarea id="content"></textarea>To initialize TinyMCE on the created textarea, type this:
<script type="text/javascript">
tinymce.init({selector: "#content"});
</script>
This will instruct TinyMCE to use our defined textarea component for the creation of the editor.
Defining the Dialog
In the next step we will create our actual dialog with the help of bootstrap. Put this anywhere in your document (I didn't found another solution than this yet so stay tuned):
<div class="bootstrap-wysihtml5-insert-image2-modal modal fade" id="myModal" tabindex="-1" role="dialog" aria-labelledby="myModalLabel" aria-hidden="true">
<div class="modal-dialog">
<div class="modal-content">
<div class="modal-header">
<button type="button" class = "close" data-dismiss="modal" aria-label="Close"><span aria-hidden="true" > × </span></button>
<h4 class="modal-title" id = "myModalLabel" > Image list </h4>
</div>
<div class="modal-body">
<input type="hidden" id="selectedIndex" value="0" />
<div class="image-list" >
</div>
</div>
<div class="modal-footer">
<button type="button" id="btn-modal-close" class="btn btn-default" data-dismiss="modal">Close</button>
</div>
</div>
</div>
</div>This is yet an empty basic modal. Nothing special. I defined the header, body and footer containing a close button. D3 will help us to generate the list out of the json data. It will be place inside the div with class image-list. More later on in this article.
The Plugin Structure of TinyMCE
Now we will actually go into the development of the plugin. Go to the folder where TinyMCE is installed. First, create a folder with your plugin name. I'll chose imagebrowser as plugin name. Second, create an empty file called plugin.min.js and put it in the subdirectory we've created. It should look like this:
/js/tinymce/plugins/imagebrowser/plugin.min.js.
Your path my be different. The most basic template for creating a plugin is the following:
tinymce.PluginManager.add('imagebrowser', function (editor, url) {
   [...]
});
We are using the Plugin class which gives us all the room to place our core logic. TinyMCE will search for the plugin.min.js file and register our plugin after initialization. Therefore the add()-function which has two parameters: The first parameter defines the name of our plugin which is later used in the plugin option of the tinymce.init function to adress our plugin to be loaded. The second paramter is an anonymous function with two arguments: This allows us to access the editor instance (we'll need this!) and the full URL to your plugin directory. In this example it would be http://localhost/js/tinymce/plugins/imagebrowser.
Add a Button
Next we would like to define a button for our plugin so we can add it later to the toolbar of TinyMCE. Add this to the body of your plugin code:
editor.addButton('imagebrowser', {
        text: 'My Image Browser',
        onclick: function () {
        }
});
This is self explanatory. The button has a name ("imagebrowser") which is used later in the toolbar option of tinymce.init to actually add it into the toolbar. You can define as much buttons as you want. It also defines an event handler that describes what should happen if we click the button. For now we want to open our dialog, so we add:
$('#myModal').modal('show');This is the way to pop up our previously defined bootstrap modal with the id myModal.
Update Init Configuration of TinyMCE
To see our plugin in action we need to load the plugin first into the editor as already mentioned. Update your code as follows:
|
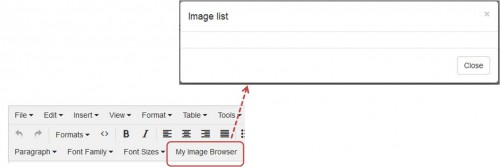 |
We added "imagebrowser" to the plugin option to load our plugin, and "imagebrowser" to the toolbar option to make the button appear in the toolbar. If you click on the the toolbar button you should see something like on the right picture.
Display the Image List
Building a Thumbnail Preview with D3
This piece of code code below defines the main logic for the creation of the preview list of our images.
function thumbnailCreator() {
    var div = null;
    var imageList = null;
    var idx;

    function create(div) {
        var thumbs = div.append("div").attr("class", "row")
                .selectAll("div")
                .data(imageList).enter()
                .append("div")
                .attr("class", "col-lg-3 col-md-4 col-xs-6 thumb");
        thumbs.append("a")
                .attr("class", "thumbnail")
                .attr("href", "#")
                .append("img").attr("src", function (d) {
            return d.imagePathThumb;
        }).attr("class", "img-responsive")
                .on('click', function (d, i) {
                    $('#selectedIndex').val(i);
                });
        var thumbcontrol = thumbs.append("div");
        thumbcontrol.append("p").html(function (d) {
            return d.description;
        });
    }

    create.imageListProcessorCallback = function(data) {
        create.imageList(data);
        create(d3.select("div.image-list"));
    }

    create.createImageNode = function () {
        idx = d3.select("#selectedIndex").node().value;
        if (idx === undefined || idx === "" || idx === null || idx === false) {
            return null;
        }
        var linkNode = document.createElement("A");
        linkNode.setAttribute("class", "mfp-image image-link");
        linkNode.setAttribute("href", imageList[idx].imagePathNormal);
        var imgNode = document.createElement("IMG");
        imgNode.setAttribute("src", imageList[idx].imagePathThumb);
        imgNode.setAttribute("alt", imageList[idx].alternativeText);
        linkNode.appendChild(imgNode);
        d3.select("#selectedIndex").node().value = "";
        return linkNode;
    }

    create.imageList = function (value) {
        if (!arguments.length)
            return imageList;
        imageList = value;
        return create;
    }

    return create;
}
If you are familiar with D3 you will quickly understand the code. The thumbnailCreator class is defined as JavaScript closure. The method create() builds a thumbnail list according to the bootstrap's thumbnail component definition. Furthermore we add a click event to each thumbnail to get the index of the element in that list and save it in the hidden field with id selectedIndex (review our modal definition before). We will extract this information later if the modal is closed and call our createImageNode()-function.
Initialize ThumbnailCreator and Insert Image
Now we need to initialize an instance of our thumbnailCreator class in the plugin. We are going to do this directly at the beginning in the Plugin class. The whole code of your plugin should look like this:
tinymce.PluginManager.add('imagebrowser', function (editor, url) {
    //Initialize thumbnail creator class
    var tc = thumbnailCreator();
    //Action when modal is closed
    $('#myModal').on('hidden.bs.modal', function () {
        if ((node = tc.createImageNode()) !== null)
            editor.selection.setNode(node)
    });

    editor.addButton('imagebrowser', {
        text: 'My Image Browser',
        onclick: function () {
                $.ajax({url: './getJSONFile.php', data: {format: 'json'}, type: 'post',
                    success: function (output) {
                        var imagelist = JSON.parse(output);
                        tc.imageListProcessorCallback(imagelist);
                    },
                    error: function (x) {
                        console.log("fail", x);
                    }
                });
            $('#myModal').modal('show');
        }
    });
});
If the plugin gets loaded by TinyMCE it will instantiate the thumbnailCreator. Furthermore we listen to the close event of the modal and add a function when the event occurs. The createImageNode() function will be called and if it's not null (that means if we clicked on an image in the preview list) we set the created node to the current selection in the editor with editor.selection.setNode(). The onclick property in the addButton function has also been updated: Before the modal opens we'll load the JSON file with an ajax call. We're executing an Ajax request to the server and returning a JSON file we specified before; and within that request we then calling the function imageListProcessorCallback with the JSON object as argument. You have to change the url ./getJSONFile.php in this case. For clarification: We're passing imageListProcessorCallback as callback handler which will be executed in that Ajax request. It's important to remember that Ajax requests are asynchronous. Otherwise it will not work. Finally the callback function of our thumbnailCreator can assign the loaded and parsed JSON object to the attribute imageList and start building the list by executing the create method - see imageListProcessorCallback in the thumbnailCreator class.
Result
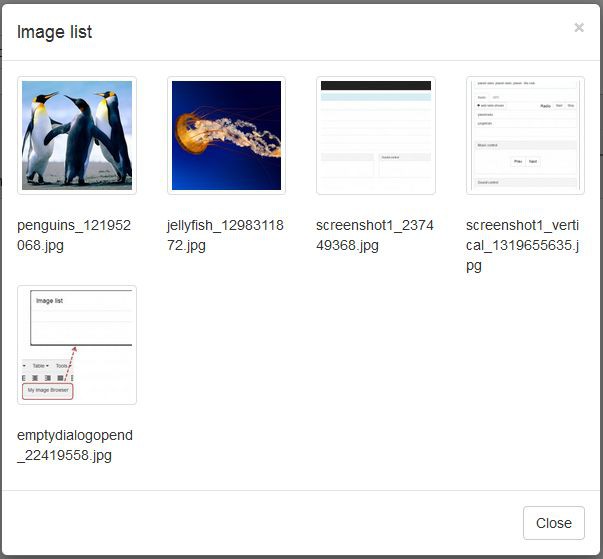
Imagine you have this json file then the dialog could look like this:
|
 |