I'm by no means an expert in shader programming. But with time and practise comes experience. You will see that this is not that hard. In the following you'll learn the basics of the famous toon shader. Furthermore you'll learn useful things along the way that needed to be kept in mind when creating and using shaders.
Later we'll use this shader in Irrlicht. There I'll show you how to install the created shader in the engine and apply it on a 3D model. Everything will be covered so that you can start right away with an example that will help you to create your own basic shaders or modify the presented one.
The article assumes basic knowledge of the different coordinate systems in computer graphics, geometric transformations and linear algebra in general. At difficult parts I will provide links to other sites.
Note: I'm using the old OpenGL 1.2 version for the programming. So please keep in mind that many deprecated methods and variables are used. That shouldn't be a problem because OpenGL is backward compatible so all functionalities from OpenGL 1.1 up to 4.5 are still available if you have a newer graphic card.
What is a Shader?
Shaders allow us to get access to the graphics pipeline of your graphic card. The graphics pipeline is roughly speaking a concept "in computer graphics and refers to a series of interconnected stages through which data and commands describing a scene go through when being rendered". You can intervene in this pipeline and changing the output on the screen through the various available shader units (arithmetic units) of your graphic card by programming them. There are many different shaders which have all there own purpose. In the course of this article the focus will be held on vertex and pixel shaders.

„3D-Pipeline“ von Martin Wantke - selbst erstellte Grafik. Lizenziert unter Gemeinfrei über Wikimedia Commons.
Vertex shaders can transform and animate the vertices of a 3D object whereas pixel shaders (also known as fragment shaders) are important towards the end of the graphics pipeline for changing the actual texture or pixel color of each fragment.
To access these shaders and their functions we use special APIs like OpenGL or DirectX and in this case GLSL for programming them. Therefore creating a shader in this article means creating a shader material.
Basic Structure
For our toon shader we need a vertex and a fragment shader programm. The basic code structure of both is as follows:
void main(void) {

}
Nothing really interesting and not that hard, right? This is how an empty shader is looking which basically is doing nothing. GLSL is very C-like. It has many built-in functions, variables and pre-computed matrices. Be sure to check out the specification.
Vertex Shader
Let's begin with the vertex shader. This is a really simple one. Because we don't need to modify any vertices of the object we only pass the position of the current vertex for later use to the other shader.
//The vertex shader

varying vec3 normalVec;
varying vec3 vertVec;

void main()
{
	vertVec = gl_Vertex.xyz;
	normalVec = gl_Normal;
	gl_TexCoord[0] = gl_MultiTexCoord0;
	gl_Position = gl_ModelViewProjectionMatrix * gl_Vertex;
}
With the keyword varying we can pass variables from one shader to another. This is also very helpful - the vertex shader has access to the 3D object. That means it can read information like material, position etc. and can some of them modify later in the pixel shader. So storing the <x,y,z> coordinates of the vertex position (gl_Vertex.xyz) and the normal vector (gl_Normal) is a good start because they're later needed for the light calculation. We also access the material color and use the predefined varying array variable gl_TexCoord to store it for the pixel shader. The uniform keyword lets us insert a variable from outside (OpenGL, graphic engine, application, ...) into the shader. This is very helpful because we want to set the light position manually rather than using the integrated variable gl_Lightpos. This gives us more freedom for controlling the light. Additionally if you use an engine you cannot rely on that because you don't know if it uses the OpenGL "light feature".
Now comes one of the most important functions of a vertex shader in general. The variable gl_Position is only available in the vertex or geometry shader and contains the position of the current vertex of a 3D object in model space (local space of that object if you want). On the other side gl_Vertex contains the position of the current vertex in homogenous coordinates. We transform that position with the Model View Projection matrix (this is a composed matrix of all three transformation matrices) so we get the 2D screen coordinates at the end. This is what you actually see on the screen. In the end the whole sceen is a 2D image. More about gl_Position can be found also here.
Pixel Shader / Fragment Shader
Next step is the pixel shader. It's an adapation from this GLSL Tutorial. Here we will colour our object in a comic-like shade. That means non-realistic colouring of each fragment. For that we use the light position and a step function for the colour. As a function of the angle of entry of the light ray we calculate the intensity. For that we need a good understanding. I can recommend this very good tutorial on shading. I will not delve into this topic to much.
Next I'll explain how the comic-like effect is realized. A comic look can be accomplished if the texture or colour is not made gradually brighter or darker along the fragments:

To get sharp transitions we use a step function which depends on the intensity of the light ray on the fragment. So one possible function could be:
where x is a 3D color vector with rgb values as elements; and i the intensity. The function alters the brightness of the color vector depending on the intensity. This will be clear in the next section when we're dealing with the lighting part of the shader code.
How do we measure the intensity of the light on a surface? First, the intensity of a wave follows the 1/r*r law so light as well. That means that the brightness of a light source is a function of distance from the light source. If the object is farther away it appears darker. To keep things simple we don't include this in our calculation. An advantage of this approach is that the object is evenly illuminated no matter how far we're away from it. It depends on the effect you want to realize.
The lighting or colour of a vertex/fragment depends also on the angle at which the light ray hits the vertex (this is a simple assumption but for a toon shader it's sufficient). The positions are calculated per-vertex and getting interpolated per-fragment; and the angle is calculated per-fragment.
Before we start let's introduce a second vector called eyeVec. This should represent our view (eye or camera) which is looking at the object and usually denoted as view or eye vector. As you will shortly see in the shader and Irrlicht code that we "simulate" the eye vector. Normally you would pass this position of your camera to your shader. But to keep things easy we simulate this vector by translating it up the y-axis by a constant amount. The light source position will actually be our camera and not a real light source. We'll get to that later in the Irrlicht section. Another assumption made is the constant intensity of the light which is a fix constant in the shader code. The current situation is depicted in the figure below.
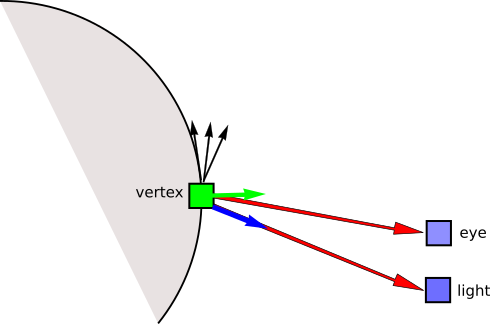
Next, we compute the correct light vector (red arrow) by subtracting the lightPos from the vertex position and normalize it. Keep in mind that the light position passed to the shader is relative to the object center and is aiming at a different vertex otherwise. We're doing this with the eye position too. Now we can calculate the angle of entry with that information. Therefore we calculate the dot product of the light / eye vector and the vertex normal (green arrow). The normal vector of the vertex was previously stored in the variable normalVec in the vertex shader.
vec3 eyePos = lightPos; //view/camera at same position as the light, but...
eyePos.y += 1; // shifted up the y-axis

//normalized vectors, red arrows in the figure are not normalized
vec3 eyeVec = normalize(eyePos - vertVec);
vec3 lightVec = normalize(lightPos - vertVec);

//angle between the vertex normal and the eye vector
float s = max(dot(normalVec, eyeVec), 0.0);
//angle between the vertex normal and the light vector
float diffuse = max(dot(normalVec, lightVec), 0.0);
The result of the dot product means: If the light is directly above the vertex (perpendicular to the fragment) the colour of the current fragment should be very bright (dot product is 1). The greater the angle between the vertex normal and the light vector the darker the colour should be. If it's around zero the light ray barely hits the vertex and is rather grazing the vertex - the fragment should be black.
For the ambient part of your reflected light we set the current texture colour but 1.4 times brighter. It's not subject to the angle of entry and the constant factor 1.4 represents the intensity of the ambient light:
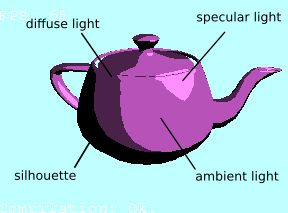
gl_FragColor = (colorTex)*1.4;The object now is to give the lighting a comic touch. This is basically what the step function is doing! By judging the angle of entry of the light / eye vector on the vertex we differently colouring the vertices. Let's start with the silhouette or outline of the model. Everything is textured black if the angle is between 75° and 90°:
[...]
if (s < 0.25) {
	gl_FragColor = black;
} else {
	[...]
}
This gives us a nice outline around the model and ensures a ink-like effect. Every light ray that is not nearly perpendicular to a vertex normal gets differently processed in the else-block.
We then take care of the diffuse lighting that should be 0.4 times darker and is depending on the angle - we use the other light vector lightVec for that. Then we're messing around with the specular light. If the light is nearly vertical to the normal vector of the vertex then again we make the texture color 1.4 times brighter.
//the else block of the pixel shader

	 	// Diffuse part
	   	if (diffuse < 0.5) {
	   		gl_FragColor *= 0.4;
		}
	   // Specular part
	   	if (s < 0.9) {
	   		gl_FragColor *= 0.8;
		} else { // light is nearly directly above the vertex
	   		gl_FragColor *= 1.4;//make it very bright
		}
The whole lighting is implemented as a rather simple form of the Phong reflection model. As mentioned before we assume that the light position is actually the camera or player position as you'll see later in the Irrlicht code. The eye vector was used to project the specular lighting above our real view point (which is in this case the light vector in the shader code).
As you can see there are many places in the codes which could be parameterized. It depends on your taste how the toon shader should actually look like. By that we can control the positions of the specular, diffuse or ambient part of the model even more. You see where it is going - you can control every bit of that shader to modify it to your needs. You could used only one light source then the shade would be more regular or of course more than two! Feel free to play around to see the effect when you change the position of eyePos in the shader code.
This is how the shader could be looking:
Screenshot taken within OpenGL Shader Maker
The whole code of the pixel shader:
// Pixel shader
// based on http://www.clockworkcoders.com/oglsl/tutorial10.htm

uniform sampler2D tex;
uniform vec3 lightPos;
varying vec3 normalVec;
varying vec3 vertVec;

void main()
{
   	vec4 colorTex = texture2D(tex, vec2(gl_TexCoord[0].st));
    vec3 eyePos = lightPos; //second light

    eyePos.y += 1; // shifting second light up

    vec3 eyeVec = normalize(eyePos - vertVec);
	vec3 lightVec = normalize(lightPos - vertVec);

	// Silhouette / outline color:
	vec4 black = vec4(0.0, 0.0, 0.0, 1.0);

	// Angle for silhouette
	float s = max(dot(normalVec, eyeVec),0.0);
	// angle for diffuse light
	float diffuse = max(dot(normalVec, lightVec), 0.0);

	//Ambient color
	gl_FragColor = (colorTex)*1.4;

	if (s < 0.25) {
		gl_FragColor = black;
	} else {
	 	// Diffuse part
	   	if (diffuse < 0.5) {
	   		gl_FragColor *= 0.4;
		}
	    // Specular part
	   	if (s < 0.9) {
	   		gl_FragColor *= 0.8;
		} else { // light is directly above the vertex
	   		gl_FragColor *= 1.4; // make it very bright
		}
   	}
}
Using the Shader in Irrlicht
Installing the Shader
Creating and adding the shader material is quite simple and straight forward in Irrlicht:
video::IGPUProgrammingServices* gpu = driver->getGPUProgrammingServices();
s32 toonShader =  gpu->addHighLevelShaderMaterialFromFiles(
			"toonShader.vert", "main", video::EVST_VS_1_1,
			"toonShader.frag", "main", video::EPST_PS_1_1,
			0, video::EMT_SOLID);
But we have to do a little bit more like error handling and implementing a callback handler to set our uniform variable lightPos for the shader. The code of the vertex shader is in the "toonShader.vert" file and the code of the pixel shader in the "toonShader.frag" file.
Implementing the IShaderConstantSetCallBack interface
To communicate with our shader we creating a new class which implements the IShaderConstantSetCallBack interface. If we then add this class as parameter to the addHighLevelShaderMaterialFromFiles() function we can be sure that Irrlicht call the appropriate function every frame to deliver our shader with the latest values. The docs already saying this:
"Interface making it possible to set constants for gpu programs every frame.Implement this interface in an own class and pass a pointer to it to one of the methods in IGPUProgrammingServices when creating a shader. The OnSetConstants method will be called every frame now."
So we create a class called ToonShaderCallback and adding two ISceneNodes as public attributes: One for the object that gets the shader material and one that should give us the light position. It should look like this:
class ToonShaderCallback : public IShaderConstantSetCallBack {
public:
	ToonShaderCallback();
	~ToonShaderCallback();
	ISceneNode* light;
	ISceneNode* node;

	virtual void OnSetConstants(IMaterialRendererServices * services, s32 userData) override;
};
The implementation:
#include "ToonShaderCallback.h"

ToonShaderCallback::ToonShaderCallback() {
}

ToonShaderCallback::~ToonShaderCallback() {
}

void ToonShaderCallback::OnSetConstants(IMaterialRendererServices * services, s32 userData) {
	core::vector3df pos_in_world_space = camera->getAbsolutePosition();
	core::vector3df pos_in_node_space(pos_in_world_space);

	core::matrix4 world_to_local = node->getAbsoluteTransformation();
	world_to_local.makeInverse();

	world_to_local.transformVect(pos_in_world_space);
	f32 lightPos[3] = { pos_in_world_space.X, pos_in_world_space.Y, pos_in_world_space.Z };
	services->setVertexShaderConstant("lightPos", lightPos, 3);
}
One thing is needed: We have to transform the global light position (position of light in world coordinates) into the model space of our actual object. Otherwise we won't get the correct toon shading effect because the calculation relies on the model coordinate system. First we get the model matrix of both nodes. Taking the inverse of the matrix means reversing all the steps and getting the world coordinates. We then can construct the 3D vector with the correctly transformed light position and send them to the shader:
services->setVertexShaderConstant("lightPos", lightPos, 3);Adding the Shader
Applying the shader material on the 3D model in Irrlicht is not more difficult than applying any other material:
node->setMaterialType((video::E_MATERIAL_TYPE)toonShader);You can also apply or discard the same or different shaders for different materials:
for (int i = 0; i < node->getMaterialCount(); i++) {
    node->getMaterial(i).MaterialType = (video::E_MATERIAL_TYPE)toonShader;
}
End result
As you could see the creation of a basic toon shader is not that hard. It can be a lot of fun playing with the code and see what actually changes. Here are some pictures of the shader in action:
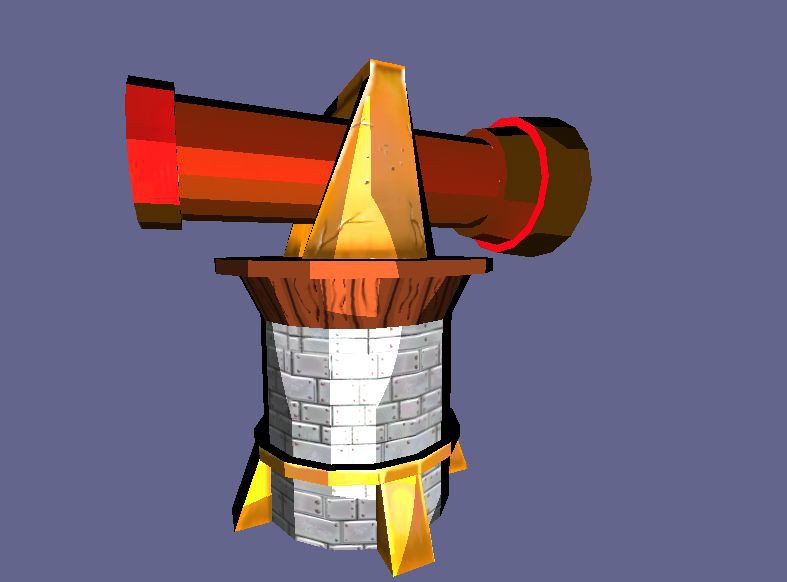 |
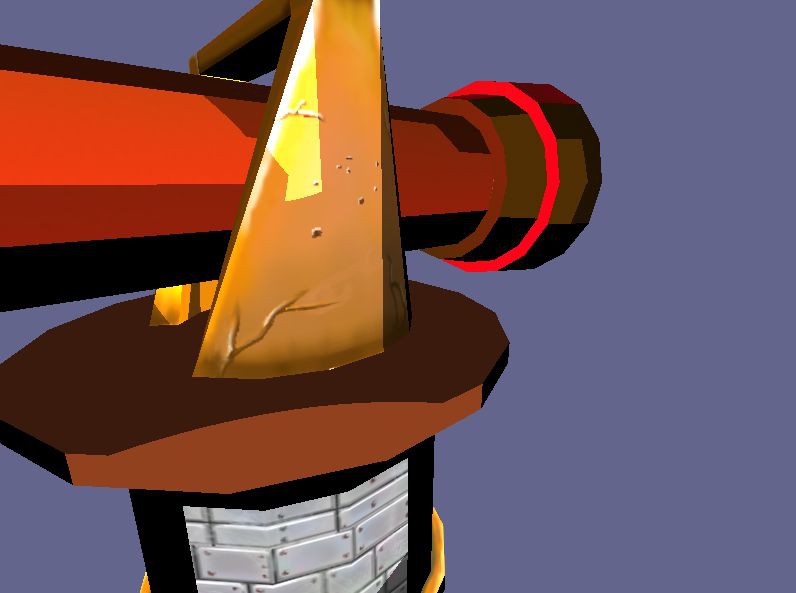 |
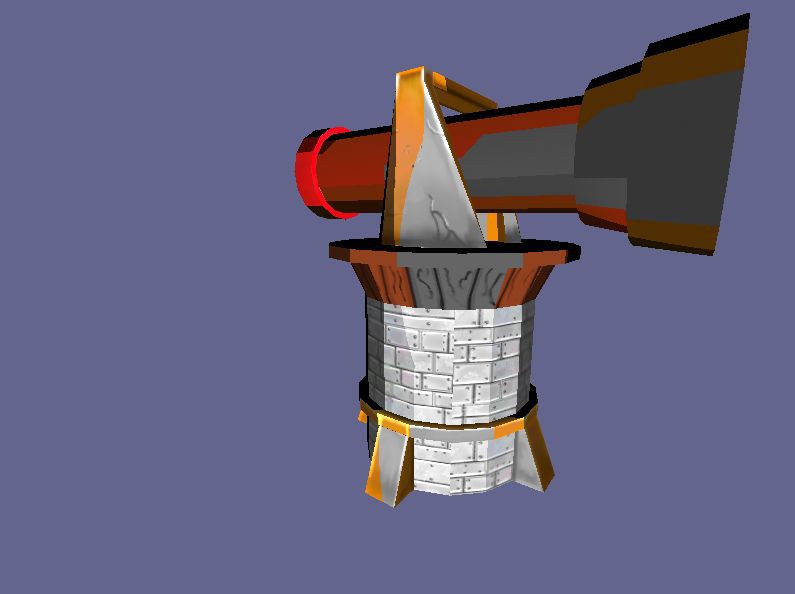 |
Exercise for you
What changes are needed in the shader code to realize an output like in the image on the right-hand side?